Wyckoff Distribution Schematic
Wyckoff re-distribution schematic #1 btcusd "dump et" for bitfinex Wyckoff 101 — part 4: distribution Richard wyckoff’s accumulation and distribution phase – trading coach
KH Tang's Blog: Stock Market Tools (14) - Wyckoff's Schematic and
Wyckoff distribution schematics tradingview chart Btc in wyckoff distribution schematic for bybit:btcusd by make1798 Wyckoff schematic distribution phase stock phases market volume richard method patterns demille wycoff tang kh various figure forex em know
Wyckoff trading method: how to trade supply demand
Distribution wyckoff schematics partWyckoff schematic distribution accumulation chart thought looks much after imgur below made After much thought, looks like wyckoff distribution schematic #1 forWyckoff accumulation downward phases.
Wyckoff distribution schematic: for kraken:xbtusd by brenfren — tradingviewWyckoff's schematics Wyckoff's distribution schematic #1: events & phases for gemini:btcusdWyckoff btc distribution schematic tradingview.

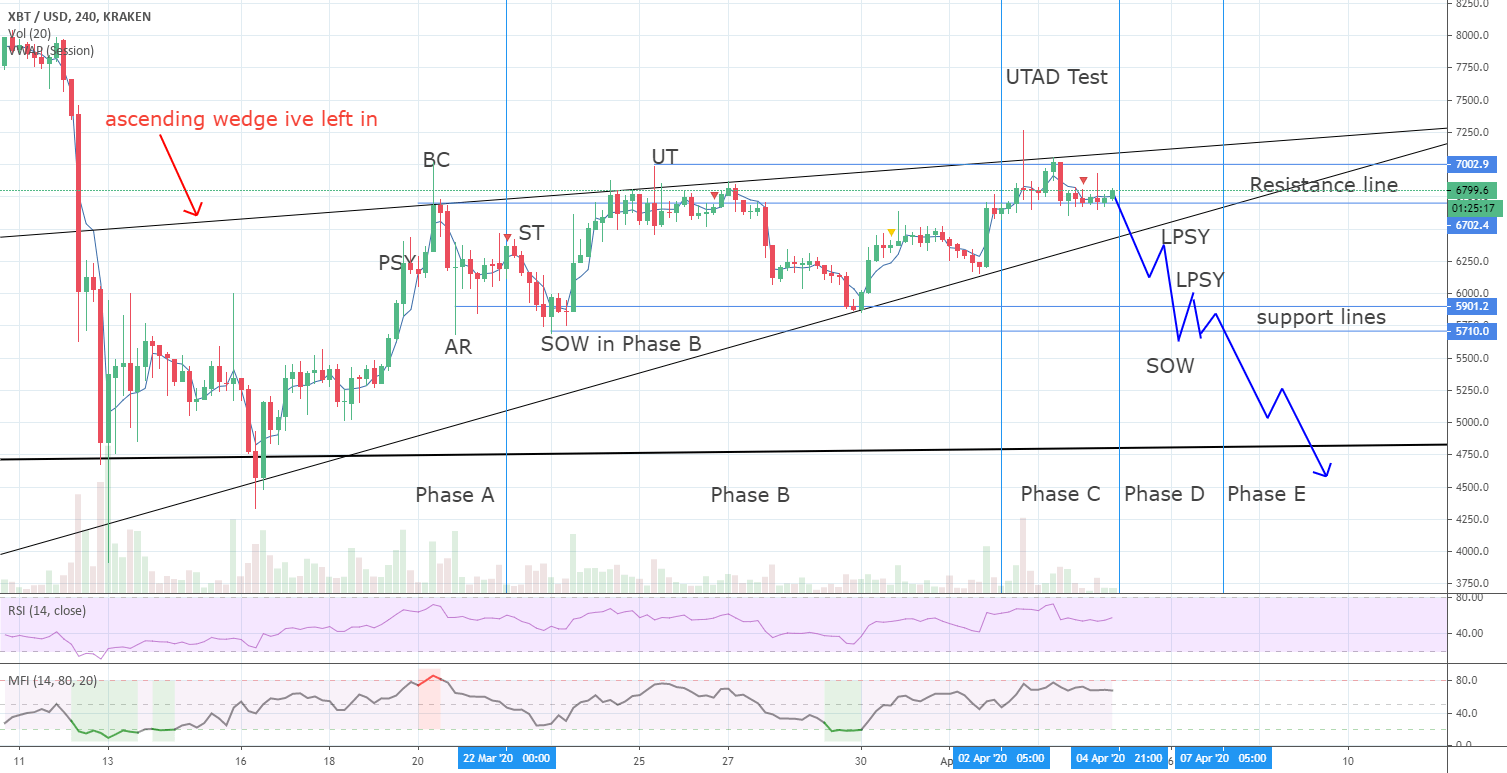
Wyckoff distribution schematic tradingview chart kraken
Wyckoff distribution schematics mediumWyckoff accumulation occurs tradingcoach What is the wyckoff method? #2 distribution schematic for cexio:btcusdWyckoff distribution schematic phases events chart tradingview.
Wyckoff tradingviewWyckoff method trading distribution supply phases accumulation demand Wyckoff distribution method tradingviewWhat is the wyckoff method? #2 distribution schematic for cexio:btcusd.
Wyckoff distribution schematic #2 phase d extended for index:btcusd by
Wyckoff 101 — part 4: distributionBitcoin tradingcenter wyckoff schematics qbn Schematic wyckoff distribution re tradingview btcusdAn overview of the wyckoff method: part 2.
Wyckoff tradingviewKh tang's blog: stock market tools (14) .


Wyckoff's Distribution Schematic #1: Events & Phases for GEMINI:BTCUSD

What is the Wyckoff Method? #2 Distribution Schematic for CEXIO:BTCUSD

BTC in Wyckoff Distribution Schematic for BYBIT:BTCUSD by Make1798

Wyckoff Re-Distribution Schematic #1 BTCUSD "Dump et" for BITFINEX

What is the Wyckoff Method? #2 Distribution Schematic for CEXIO:BTCUSD

Bitcoin - QBN

After Much Thought, Looks Like Wyckoff Distribution Schematic #1 for

KH Tang's Blog: Stock Market Tools (14) - Wyckoff's Schematic and

An Overview of the Wyckoff Method: Part 2 - Accumulation